
When a Game Block Blast board feels jammed, don’t rush. Scan it again. A piece that seemed impossible often fits along an edge, in a corner, or in a thin gap beside a nearly complete line.
If you still can’t find a strong move, switch from looking for the best play to finding the least damaging one. The aim is to buy one more turn without closing off future placements.
How to re-scan the board when nothing looks usable
Most players keep staring at the crowded middle of the board, but that’s usually the hardest area to read. A better approach is to check the grid in the same order every time so you don’t miss a small legal placement.
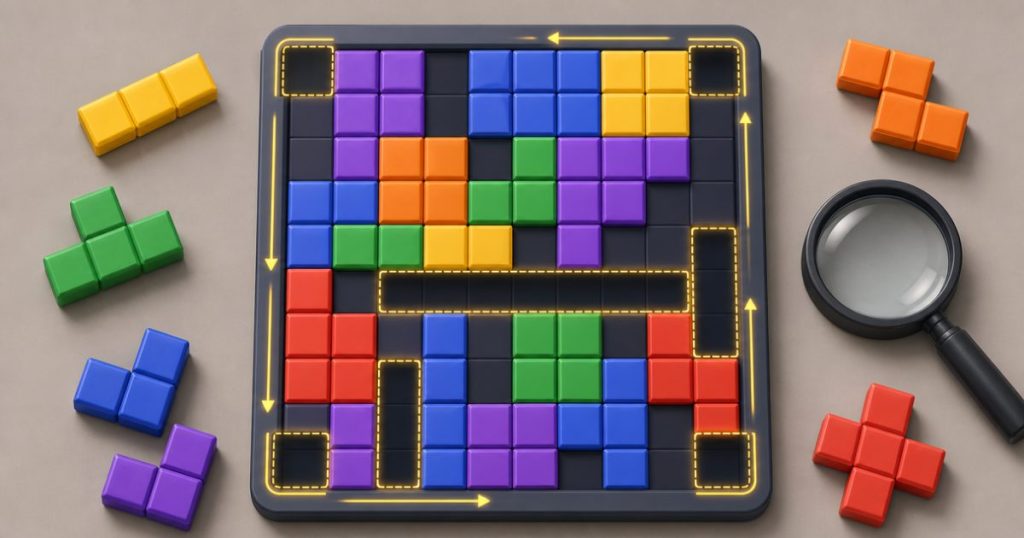
- Start with corners. Corners often hide short placements that are easy to overlook.
- Move to the edges. A piece can fit neatly against the border even when the center is packed.
- Check near-complete rows and columns. A one- or two-cell gap may be the only opening that matters.
- Look for thin gaps and 1×1 spaces. Small pieces can keep the run alive when larger shapes no longer fit.
- Only then inspect the interior. By this point, you’ve already checked the most likely recovery spots.
It also helps to start with the biggest or most restrictive piece. Large shapes are easier to eliminate, and they reveal the few places where smaller pieces may still work. If there’s only one awkward notch that fits a long piece, you want to find that before you use up your best open space.
A board can look impossible simply because your eyes lock onto the open area you want to use, not the spaces that actually accept a piece. A narrow strip along the bottom row, for example, may be the only legal home for a long bar even when the center looks more appealing.
Choosing the least damaging legal move
If you find more than one placement, don’t automatically pick the one that clears the most blocks. On an unstable board, the safest move is often the one that keeps the shape of the board most flexible for the next set of pieces.
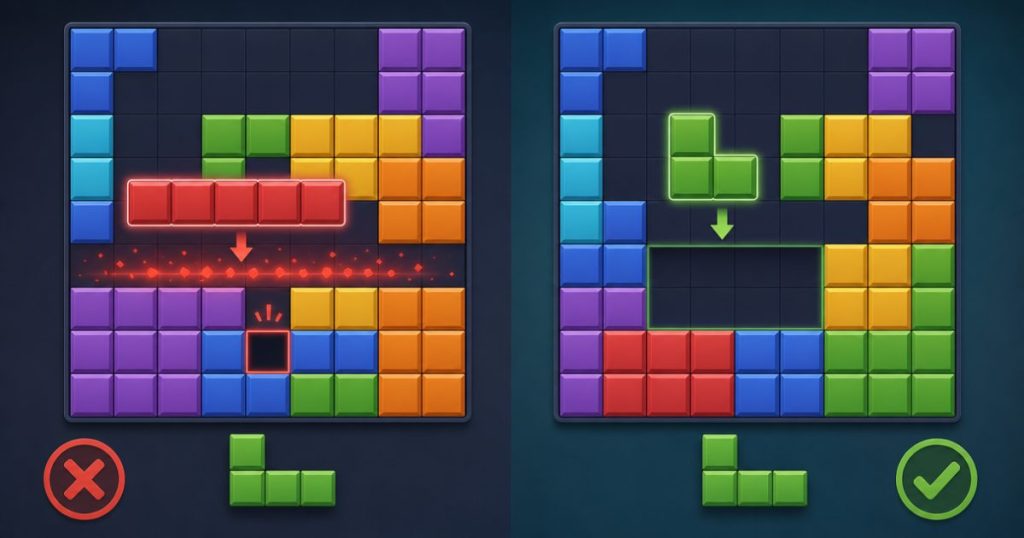
A good emergency move usually does three things:
- it avoids creating a single isolated hole;
- it keeps at least one open lane or larger connected space;
- it doesn’t box off a cavity that future pieces can’t reach.
That’s why a smaller clear can be better than a bigger one. If a line clear leaves behind a jagged pocket that traps future shapes, it may be making the board worse, not better. This is where line-clear value has to be judged against board shape, not score alone.
When you’re choosing between two bad options, ask which move leaves more future placements possible. If one choice opens a clean side lane while another creates a boxed-in gap in the middle, the first move is usually safer even if it scores less right now.
Try to avoid any move that creates a dead single-cell pocket unless it also gives you a very important clear. Tiny sealed holes are one of the fastest ways for a run to collapse a few turns later.
When to take a clear and when to preserve space
Clears matter, but they’re not always the right emergency answer. Take a clear when it removes clutter without wrecking the board shape, or when it opens a lane that gives you more room for future placements.
Preserve space instead when the clear would split the board into awkward islands or leave behind a cavity that only one rare shape can use. In those moments, the immediate score gain usually isn’t worth the loss of flexibility.
A simple rule helps:
- Take the clear if it frees space and keeps the board open.
- Skip the clear if it creates a trap or blocks a future large piece.
This is also why combo chasing gets risky on a crowded board. A combo helps only if it comes from a move that still leaves the board playable. If the combo forces a worse structure, you may gain a few points and lose the run soon after.
How to tell a temporary jam from a true dead end
Not every blocked-looking board is over. Sometimes the board is only temporarily jammed because the current three pieces don’t match the open spaces well. Another set of pieces might fit better.
A true dead end is different. It means no legal placement exists for any of the current pieces, even after a careful re-scan of corners, edges, and thin gaps. In standard Block Blast play, you also can’t rotate pieces to force a fit, so if the shapes truly don’t match the open spaces, the run is finished.
The practical difference is simple: a temporary jam still has at least one legal move. A dead end does not. If you keep finding placements after a slow scan, the board is still recoverable, even if it looks ugly. If every shape fails every search pass, don’t waste time trying to force it.
That’s also where a solver-style tool can be useful for learning patterns, as long as you use it as a teaching aid rather than a crutch. If you want to study recovery logic more closely, this guide on using a Block Blast solver explains how to keep the game challenging while still learning from hard boards.
Board habits that make these jams happen less often
The best way to handle a blocked board is to create fewer of them in the first place. Most dead-looking boards come from the same few mistakes.
- Don’t isolate single-cell holes. They’re too small for most shapes and often stay useless for several turns.
- Don’t box off cavities. Once a pocket becomes unreachable from the edge, it can turn into dead space.
- Keep at least one open lane. Long pieces need room, and a board without a lane becomes fragile fast.
- Balance your clears. Clearing only the easiest lines can leave the board oddly shaped.
- Respect the perimeter. Edge space is often the last place that can still accept awkward shapes.
Corners deserve special caution because they can help or hurt you. A good corner placement can tidy up the board, but a bad one can trap future pieces and shrink your usable area much faster than you expect. If you want a deeper look at that risk, the article on corner strategy in Block Blast goes into when corners protect your run and when they quietly ruin it.
One more habit helps a lot: place the most restrictive shape first whenever possible. If you leave the awkward piece until last, you may discover too late that it has nowhere to go. Handling it early gives you a clearer picture of what kind of board shape you can safely maintain.
A quick self-check before you give up on a board

Before you call a run dead, run through this short check:
- Have I checked corners and edges carefully?
- Did I look for a thin gap or a 1×1 placement?
- Am I missing a legal spot along the bottom row or side wall?
- Would a smaller clear preserve more future space than a bigger one?
- Am I treating a combo as more important than board shape?
If the answer to all of those is still no move, the run is probably over. If you find even one legal placement, choose the one that keeps the board most open, not the one that feels most satisfying in the moment.
Frequently Asked Questions
Why do all my Block Blast pieces seem impossible to place?
Usually because the board is crowded in the center and you’re missing small legal fits along the edges, corners, or near-complete lines. In some runs, the current pieces simply don’t match the open spaces, so the board only looks playable.
Should I always take a clear if it’s available?
No. Take the clear if it improves the board shape or opens space for future pieces. Skip it if it creates isolated holes or boxes off a cavity that will be hard to use later.
How do I know if the run is actually over?
After a careful scan, if none of the current pieces can legally fit anywhere on the board, the run is over. In standard play, you can’t rotate pieces to force a placement.
What mistake causes these blocked-board situations most often?
The biggest causes are isolated single-cell holes, boxed-in cavities, and ignoring the board perimeter. Those mistakes shrink your usable space until even simple pieces stop fitting.
When none of your Block Blast pieces seem to fit, the best response is to re-read the board methodically and protect the strongest shape you can, not to force a flashy clear. Check corners, edges, and thin gaps first, then take the move that leaves the most future options open.
If this keeps happening, the real fix is usually better space management: avoid boxed-in holes, keep one open lane alive, and stop chasing small score gains that damage the board. Those habits do more for long runs than any emergency move.


